
 Click here to see all of our Software Training Courses
 I’m really pleased to be writing this guide for you today. I’ve come to realise that one of the most daunting things about Adobe InDesign for newbies is the InDesign toolbar.
When people first fire up InDesign, open a new document and then sit down ready to begin, they’re met with a huge blank page, some funny lines, and then, bordering the left flank and the top of the screen are a whole bunch of icons, which, although they look vaguely familiar, don’t really explain themselves very well.
Indeed, even when we hover our cursor over each tool so that a little explanatory text box appears, all that we’re told is that this is the ‘Line Tool’, or the ‘Selection Tool’, or the ‘Type Tool’. Ok, we think – I know what a Line is, I know what Type is, and I think I know what I might have to do with the ‘Selection Tool’ – but how on earth do I use them?

Is it a straight line? A red line? A squiggly line? Do I need to ‘Select’ one?
And how big is this type anyway?
Avoiding Early Stage Abandonment
None of this is self-explanatory. And unless it is explained to new users, they tend to get very frustrated very quickly and can be prone to giving up at the first hurdle.
And so this is why I’m so pleased to be putting this guide together today. For I believe that if more people could just get to grips with the basic InDesign Tools quicker, there would be less abandonment at the early stages. I’m not going to cover every single tool in the column here (as I say, InDesign is so darn big it would need a book the size of War and Peace to explain everything), but the most important ones that you cannot do without. If you understand how to use these tools, then you will be ready to pretty much start creating any sort of document you like with InDesign.
So, without any further waffling on, let’s get down to business.
The InDesign Toolbar Explained
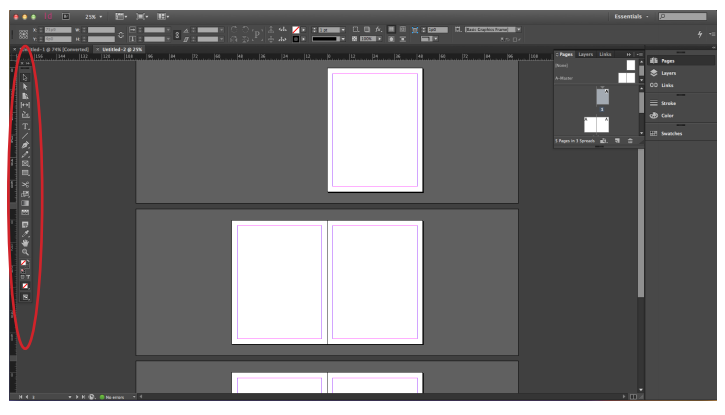
For the purposes of this blog, we’re going to be focussing on the tools in the left hand sidebar only, i.e. this one:
Ok, so we know where we are and what we’re looking at – so let’s now take each of the most useful tools one at a time and explain their usage.
Rectangle Frame Tool

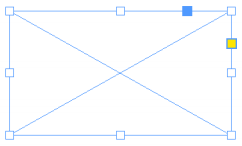
Let’s start with the Rectangle Frame Tool. With this tool, you simply drag out a rectangle frame on your document, and within it you will place pictures, or fill it with colour (note: the frame will be transparent in the finished document). It will look like this:
Once you have the frame, you simply use the Selection Tool (see below) to click on it. Now go to File > Place and select from your library the image that you want to go into the frame.
If the image doesn’t fit properly, you can either use the blank squares on the frame to adjust its size, or navigate to Object > Fit frame proportionally. This will automatically scale your image to fit the frame. Your image may still be cut off in places, however, so you may still need to adjust the size of the frame manually. Have a play around until you’ve got it just right.
Type Tool

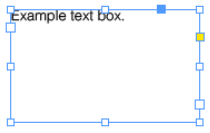
In order to place text on your document you need to insert a Text Box. So, select the Type Tool, and then drag out your Text Box on your document in the place where you want your text to go. Then, simply double click inside the Text Box to begin typing.
You can then adjust font, size and spacing in the normal ways.
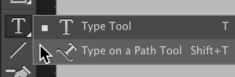
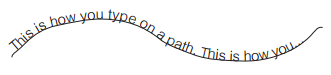
You can also ‘Type On A Path’. Say you wanted to create a wavy line of Text, first create your wavy line using either the Pencil Tool or the Line Tool (see below). Next, select the Type On A Path Tool, found here:
Now simply click on the beginning of your path, and drag the cursor along to the end. When you begin typing, your text will follow the path.
Line Tool

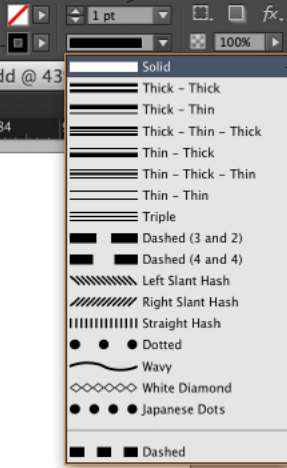
The Line Tool couldn’t be simpler – all you do is drag out a line from point to point. After which, all aspects of the line you’ve drawn can be edited:
Rectangle Tool

Use the Rectangle Tool to create shapes. Unlike the Rectangle Frame Tool, the shapes that you create with the Rectangle Tool will retain their outline.
To make a rectangle, simply drag one out. For all other shapes, go to Object > Convert Shape and select the shape you want. You can then adjust the size and contours of the shape by dragging it out.
Fill And Stroke Tools

With these tools you can start adding colour to your shapes. There are two boxes – the top left one controls the fill (meaning the inside of the shape), and the bottom right one controls the stroke (outline). Whichever one is on top is the one that is being affected by the changes you make.
When you double click on the box that you want to colour, the colour picker will appear. Pick your colour and select Ok.
Gradient Tool

Once you’ve added colour to your shape, you can apply a gradient with the Gradient Tool, so that the colour fades from one side to another creating a cool effect. Adjust the properties of the gradient in the box that pops up.
Selection Tool

By now your document will be full of frames and shapes and images and text and objects. When you want to move these around, use the Selection Tool and click on the appropriate frame.
Use the Selection Tool also when adjusting the size of frames and objects.
Direct Selection Tool

The Direct Selection Tool is when you want to move objects or images inside their frames, without moving the frame itself.
For instance, you may not be completely happy with how your image has been aligned to fit a frame. By using the Direct Selection Tool, you can select the image and move it around within the frame, and the frame will stay put.
Ok, those are the basics covered.
But this is just scratching the surface. To learn more, why not sign up for one of our streamlined and affordable Online Training Courses, or go the whole hog and book an InDesign Training Course here with us, where you will be taught under the guidance of an industry professional. We hope to see you soon!