 As with so many things in life, when it comes to optimising your images for the web, it all comes down to striking the right balance.
The images on your website will play an extremely important role in visitor retention. And in fact they will do this in two ways – one aesthetic, and one technical.
Firstly, the images you choose for your website of course need to be of professional standard and quality. They also need to be germane to your brand and your online message to the world. They need to be original, too, as well as eye-catching, beautiful and thoughtful. If your images lack any of these qualities then you run the risk of visitors to your site feeling less than enamoured, and that is not a good thing.
Indeed, just as with a plate of food, consumers ‘eat with their eyes’ first, and this means that your web pages need to be visually appetising upon first glance, and it is through your images that you will achieve this – or not.
The second consideration that you need to take into account is a technical one – what is the file size of the image? The online world is fast and furious, and one of the biggest mistakes you can make is to include an enormous file that takes an age to download each time a potential customer visits your site. Put simply, the modern-day internet user is an inherently impatient creature, and will not hang around for long waiting for an image to load.
Striking The Balance
So, on the one hand you need to make sure that your images are high quality and not pixelated. On the other, the image needs to load quickly, otherwise you will disengage the visitor and likely lose them before they’ve even had a chance to read your amazing copy. Generally speaking, the higher the quality of the image, the longer it will take to load.
So, what you need to do is strike the perfect balance between file size and quality in order that your images will always download quickly, but the quality of them will not be compromised.
Understanding Image Formats
Lossy vs. Lossless
There are actually many different image formats that can be used, but they are not all best suited for the web. Below I’m going to talk about the 3 most common image formats that are best used for the internet – GIF, JPEG, and PNG – but first let’s get to grips with image compression. There are 2 types of image compression – lossy and lossless.
We’ll start with lossless. When you decompress the compressed data in a lossless image, you will be returned with exactly the same image as the original. However, with lossy compression, you won’t. When you look closely at a decompressed lossy image, you will see that it actually lacks some quality as compared to the original – but, so long as you don’t zoom in, then the image will normally be sufficiently like the original image to convince your visitors. Lossy compression is good for web, because images use small amount of memory. Lossless compression, however, uses a greater amount of memory, so sometimes it may not be good for web.
GIF
This format is a bitmap, which means it’s a grid made of tiny pixel squares. Data about every pixel is saved (so it’s lossless), and you can save up to 256 colours. Pixels may also be transparent. GIF may contain more than one frame, so it can be animated. Since image programs can control the exact number or colours stored in a particular image, it is a good format for saving images with less colours, like charts, small graphics (bullets, website buttons), images containing text, flat-colour drawings etc.
JPEG
This image type is lossy, and you can control the compression level in image editors. It is good for saving images with millions of colors, like photographs, drawings with many shades, images containing gradients etc.
PNG
This format was created to become the new and improved GIF, because GIF was patented. PNG is a lossless format. There are two types of PNGs, an 8-bit and 24-bit. 8-bit can store up to 256 colours, like GIF. 24-bit can store millions of colours, and it also has partial transparency. It’s best to save images in this format when you need to preserve both transparency and a large amount of colours.
How To Optimise Photos For The Web In Under 2 Minutes With Photoshop
Ok, so, to save images properly on Photoshop, you need to consider 2 things – image format, and compression. The right combination can reduce the size of the file by up to 5 times, significantly improving the loading time of the web page.
While you may sometimes feel the need to use GIFs, my advice would be to keep things simple, and use JPEGs photos or images with lots of colour, and use PNGs for simpler images or when you need transparent images.
But, since this is a tutorial for optimising photographs, the im`ge format will be JPEG.
Ready to optimise your image for the web in under a minute…? On your marks, get set, GO!
- Click ‘File’
- Click ‘Save For Web And Devices’
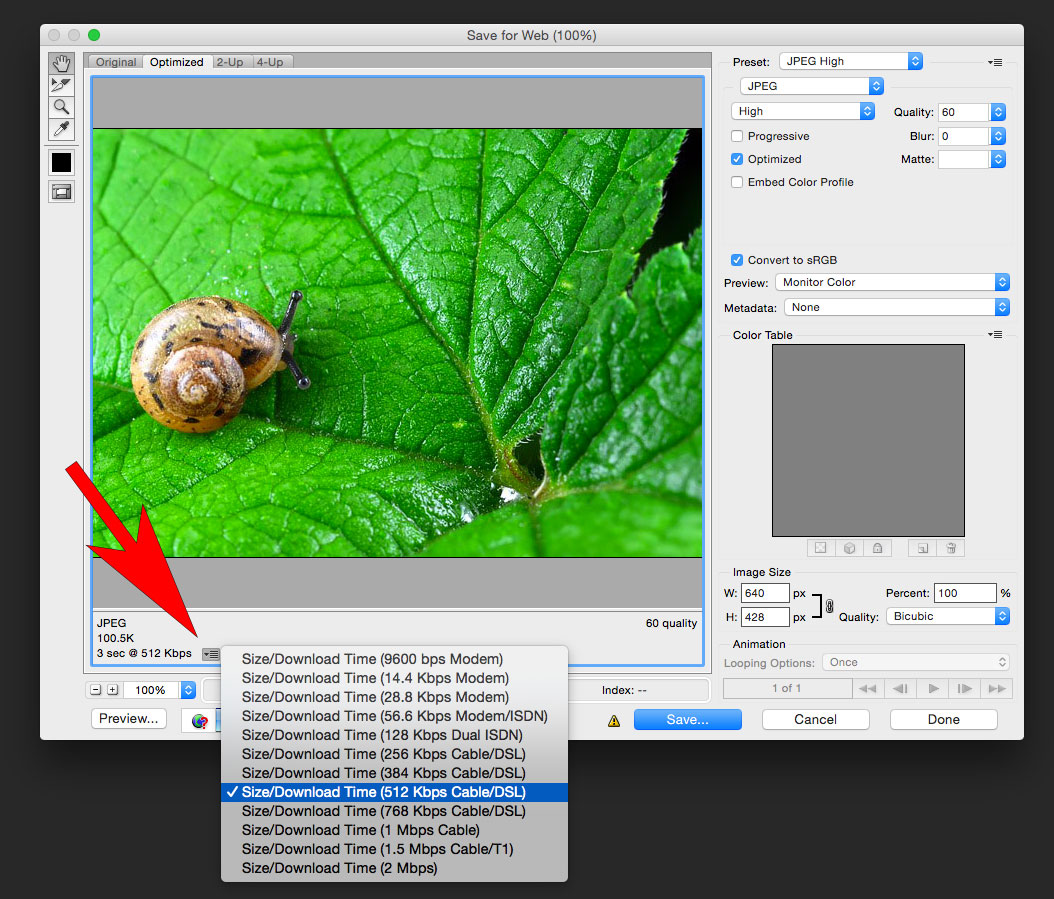
- A save screen will have opened. Check the ‘Optimized’ box.
- Select ‘JPEG: High’ (selects JPEG quality at 60)
- Check the ‘Convert to sRGB’ box.
- Select ‘Percent 100%’
- Select ‘Quality: Bicubic’
- Bottom left of screen, click on the Select download speed icon to change the Size/Download Time to get an estimate at how it will take to download. 5 seconds is definitely top end.
- Click ‘Preview’ to get a preview of your image.
- If you’re happy, click ‘Save’.
Your image is now optimized for the web.
This is the quick version of image optimiation for web use – how did you get on with it? Let us know in the comments below.
Would you like to learn more about Photoshop? Check out our Photoshop Training Course.

 Click here to see all of our Software Training Courses


One thought on “How To Optimise Photos For The Web In 2 Minutes With Photoshop”