No more sticking text onto bits of paper and photocopying, there is now a much easier way of creating your very own Fanzine – all you need is a few basic skills in Adobe InDesign.
For those of you who are a bit hazy on what a Fanzine is, let me explain. Fanzines have been around for more than 100 years. They first took the form of science fiction publications in the late 1920s, and are essentially amateur magazines produced by fans. Indeed, Fanzines – or ‘Zines’, as they are also known – have become an exclusive form of magazine up until the present.
The most influential Zines over the past 40 years or so have been the so-called punk-zines, with perhaps the most recognisable of the bunch being Sniffin’ Glue. You should check some of them out – they’re pretty cool (even if a little rough around the edges, bit that’s all part of their charm).
These days, Fanzines can be books, papers, or even websites. They are self-published by the creators and typically not-for-profit – their purpose being to promote a certain person, band, organizations, political party (or what have you). This means anyone can be the author, and so naturally there are some inconsistencies in the quality of the publications (but not yours, which will be top-notch – especially after reading this blog).
Such is their ‘underground’ status, Fanzines can often be a little controversial – which perhaps is why they mostly fail to break into the mainstream. But, to be honest, this is all part of what makes them so cool.
Anyway – enough history. Let’s get creating!
Getting Started
Open up InDesign and start a New Document, bringing up a task box. Copy my box below in terms of size and orientation so we can be on the same page as we go forward. Click ‘OK’ to open up the blank document.

On the right hand side of the window, notice the Pages Tab. Click this and your pages in the document will appear. Navigate to the A-Master Page, click on this so its highlighted (see below). This will be your template page – any layout elements that you apply to this page will be mirrored on all other pages in the document.

First of all, let’s start with page numbers. Click the T symbol on the Tools Palette (the Tools Palette runs vertically down the left hand side of the page) and click where you want the page number to be. Next navigate to the menu bar at the top of the workspace, and select Type from the drop down menu, then click Insert Special Characters > Markers > Current Page Number. An ‘A’ symbol appears in the text box, but don’t worry – it will change to page numbers as this is just the template page. Copy and paste the A symbol to the next page of your master pages.
Click back to your original page. This will now be numbered 1. To add more pages simply click the page symbol at the bottom of the Pages Palette.
Placing Images
Now let’s place an image, which can be done by going to File > Place. Your cursor will turn to a paintbrush type symbol with the low opacity image. Click anywhere to place the image. When the outline is blue, this means the targeted area is the outside box containing your image, when the circle symbol is clicked shown in the middle of the box, it will bring up an orange box, which means the image is available for resize.

The image above is currently overlapping the page. Notice the pink box outline around the page, this shows the cut-off point. Resize images inside these lines. Resize the outer box to the desired fit. To fill the frame with the desired photo, simply right-click the image and select Fitting > Fit Content to Frame. The image will now fit the frame.

Text
As before, simply click the T symbol and click anywhere on the document to create a text box. Type the desired text. To change the font, size, alignment etc., navigate to the menu bar at the top of the document.

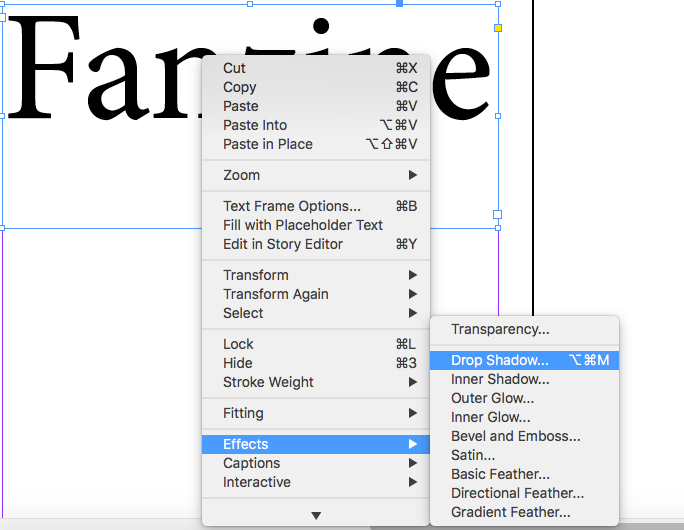
A great thing about InDesign are the effects available for the chosen text. To find them, simply right-click on the text box, go to Effects and notice the drop down menu displaying the different options. Let’s start with the drop shadow option.

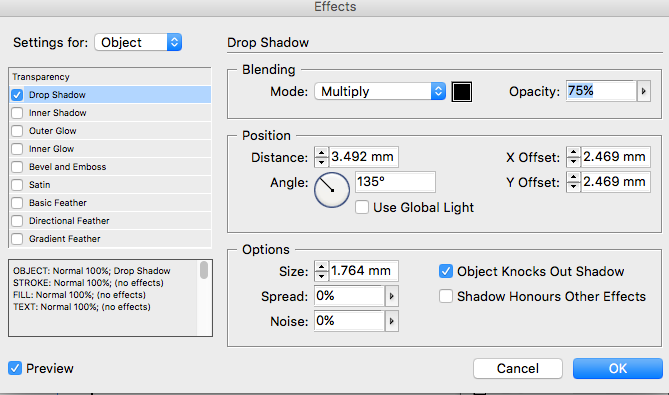
The task box that appears shows all the options for your shadow. This includes the size of the shadow behind the text and the direction and opacity. Get creative and explore these options to see what best fits your vision.

To preview your document with no bounding boxes, go to the top of the window and from the drop down menu as shown below click preview.

And there you have it, get creative, move text and images around until you have the desired effect for your very own Fanzine. Get publishing, and go get your fans!
To learn more, why not sign up for one of our streamlined and affordable Online Training Courses, or go the whole hog and book an InDesign Training Course here with us, where you will be taught under the guidance of an industry professional. We hope to see you soon!
