Photoshop CC. It really is the only photographic manipulation tool that you will ever need, and with each new update it just gets better and better.
Most of our students that walk through our doors here at Creative Studios Derby want to know how to do one thing (or rather a couple of things) with Photoshop – remove unwanted images from images, and/or move objects within images to a different place within the same image. Indeed, this seems to be the most magical attribute of all of Photoshop’s abilities, and everyone wants to know how to do it.
Now, this type of photo manipulation has always been achievable in Photoshop. However, in earlier versions it was quite a difficult thing to do right – in fact it was quite a difficult thing to do at all.
However, in its most recent incarnation, moving and erasing objects from images is no longer difficult, and indeed the results are the best that they’ve ever been. And it all comes down to Adobe’s Content-Aware Technology.
As you can tell by the title, this technology is a smart technology, in which Photoshop automatically recognises different sections of any image that you happen to upload. By using some simple selection tools (and the Lasso Tool is one of your best friends here), the software is able to intuitively recognise what you’re trying to achieve with a selection, and either preserve it as you erase unwanted surroundings, or erase the selection and automatically blend in the surroundings in its place.
Sounds pretty darn good, doesn’t it?
Well, the even better news is that the Content-Aware Technology is super simple to use – so let’s start you off on a walkthrough to get going, and you will be getting to grips with it in no time.
Fixing Images With Content-Aware Technology
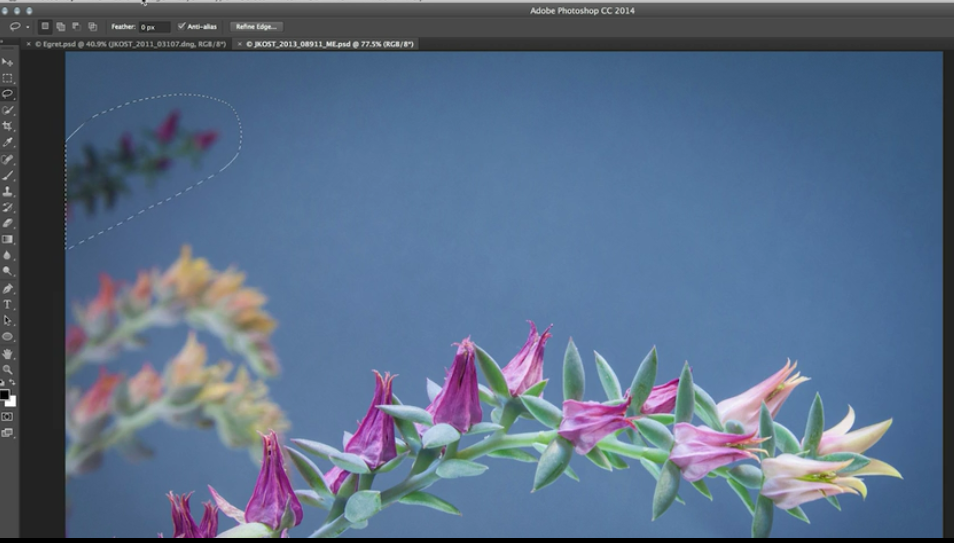
Take a look at this image:

Let’s say that we want to remove those blurred cactus flowers from the background, but of course we want the background to remain that perfect, even, blue and not look patchy.
So, first up, let’s get rid of the top-most object. Using the Lasso Tool, draw a rough line around the cactus.

Now, to get rid of this unwanted object, simply go to Edit > Fill. A task box will appear, and within it you will need to ensure that Content-Aware is selected and that you check the tick box entitled Colour Adaptation. Now, when you click OK, the cactus will have vanished, and the background blue will be nicely blended into the rest, with limited seams.
So far, so simple.
Removing that lower image from the background, however, as you might predict, is going to be slightly trickier (but, as with so many things in life, it’s pretty simple when you know how).
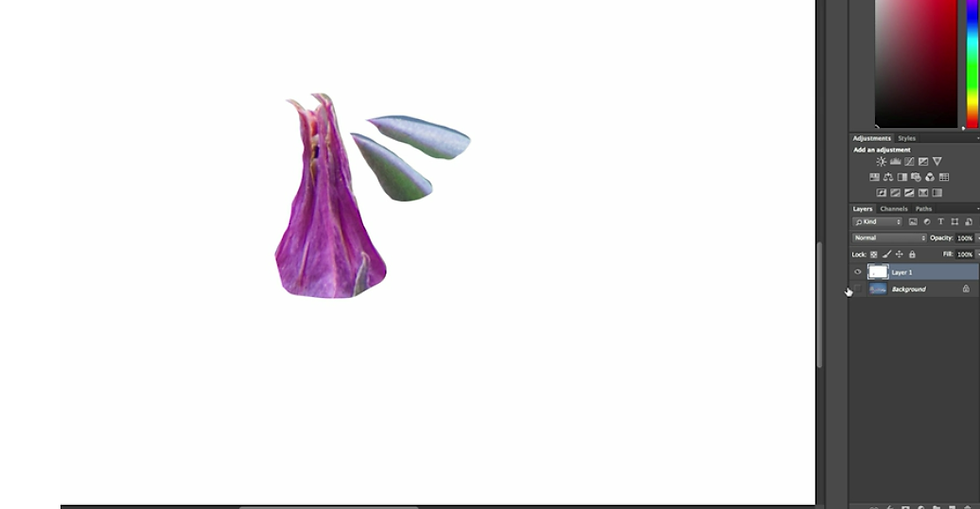
Ok, first up, you need to ‘protect’ the sections of the main foregrounded image of the cactus that you want to preserve. As you can see, there is a little moment where that lower background cactus clashes with the cactus in the foreground.
So what we need to do is get the Lasso Tool out again, and drag around the areas in the foreground that we want to protect when we remove the troublesome blurred cactus in the background. As you can see from the below image, the artist has dragged around 3 areas (holding down the shift key in between when you let go of the cursor means that all three areas will be considered together), and then they are given their very own layer by using command J (mac) or Control J (Windows).

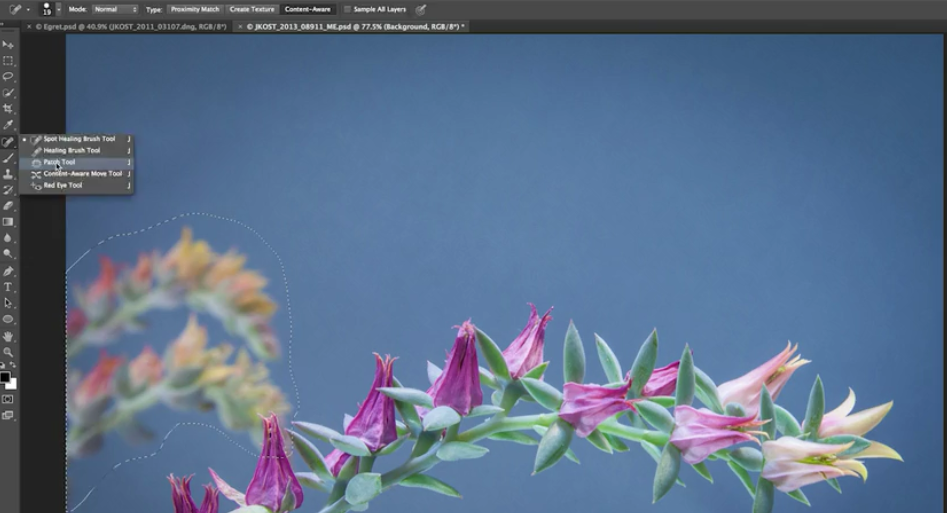
Ok – Lasso Tool out again, and this time drag around that lower cactus in the background, and then select the Patch Tool.

Now, in the top of your screen, you will need to make sure that the Patch Tool is set to Content Aware, and then you will have the option to set the Adaptation settings – Colour and Structure.
So, to use the Patch Tool, simply drag the selection (i.e. the Patch) over to a part of the background which you want replace the background cactus with, and Photoshop will fill in the rest.

Once you’ve got to this stage, you can readjust the Adaptation settings. You will find that the higher you set the Structure, the better Photoshop will blend the edges around the area where the foreground cactus comes into conflict with the background one. You’ll have to experiment with the numbers until you think you’ve got the blend just right. Adjust the Colour settings, and Photoshop will recalculate the surrounding area. Keep experimenting until you’re happy and are left with an image free of all background blemishes as if they were never there in the first place.
It really is that simple!

Want to learn more of the magic of Photoshop? Book up on one of our Photoshop Training Courses today and learn all the skills you’ll ever need first hand from the personal instructions of an industry expert.
(All images for this blog post taken as screenshots from Adobe.com)
