Creating PDF forms with Adobe InDesign
<a href="https://creativestudios.thinkific.com/courses/indesign-essentials" target="_blank" rel="noopener">50% OFF WITH CODE 'CSBLOG'</a>
Creating an interactive PDF form in Adobe InDesign enables your end user to fill in a form using Adobe Acrobat then submit the completed form back to you via email so you can collect the data that you require.

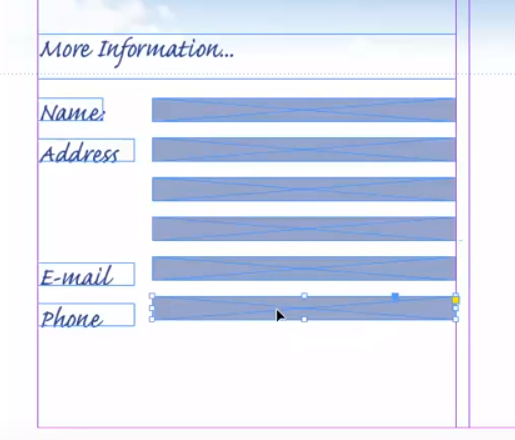
The first step is to create the titles of your form fields on your Adobe InDesign page, you can just use regular text frames, there will be no interactivity added to these frames as they are not going to move, you can also choose whichever font and colour that you require.

Then we are going to use Adobe InDesign's blank square frame tool to add some frames in the position that we are going to want to have the form fields, these will be where the end user types in their response within Adobe Acrobat.

To make the form work we need to create a submit button for the user to click that will then send the information back to you via email. The Submit button can be made in any shape that can be created by Adobe InDesign, you will probably want text adding to the button so its clear that the user has to click on it for it to work. When you add the text on top of the Adobe InDesign submit button be sure to group them together, this is essential as we are going to convert both the text and the frame in to a button at the same time.

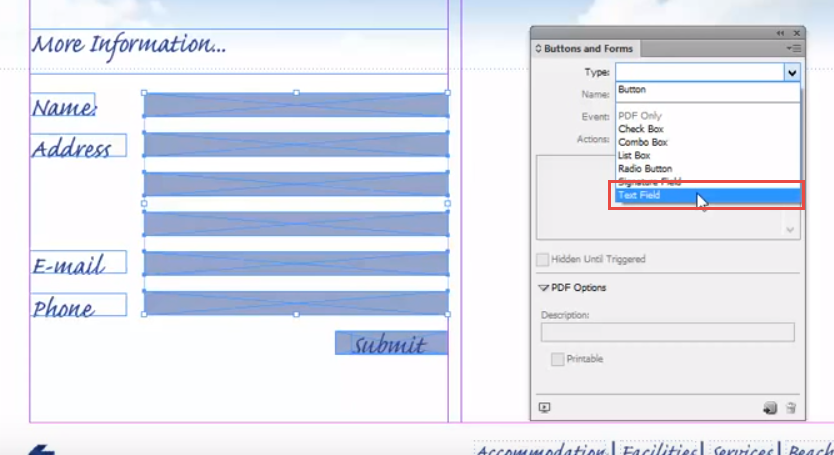
Then open your Buttons and Forms panel (Window > Interactive > Buttons and Forms) and select all of the Adobe InDesign frames that you want to be the active form fields. Then in the top of the Buttons and Forms panel you can click on 'Type' then change it to 'Text Field'.

Now we are going to convert our Adobe InDesign Submit button in to an active button. (Remember to be sure that you have grouped both the text and the shape together) Select the button frame then in your Buttons and Forms panel click on the small button at the bottom that will convert the Frames in to an active button.

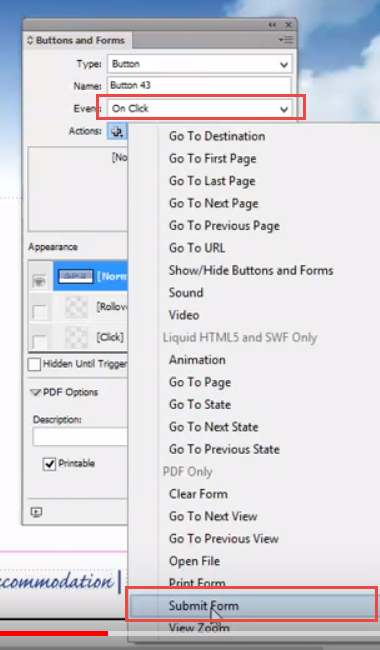
With the submit button selected we are going to change the 'Event' at the top of the buttons and Forms panel in to 'On Click' then underneath there is the option to add an 'Event' click this and scroll right to the bottom and choose 'Submit Form'

As we have created an Adobe InDesign button we have the option to create a rollover state, this is a really nice addition that makes the button standout and give it even more interactivity. If you click on the 'Rollover State' to make it active then make the changes that you wish to appear when the user rolls their mouse over the top, this could be a change of colour or any effect for example drop shadows etc.

The final thing we need to do on theis Adobe InDesign page it to add the URL, this is the destination that the form will be sent to when the user clicks on the 'Submit' button. This is likely to be an email address so you need to type 'mailto:mark@creativestudiosderby.co.uk' obviously change it to the relevant email address!

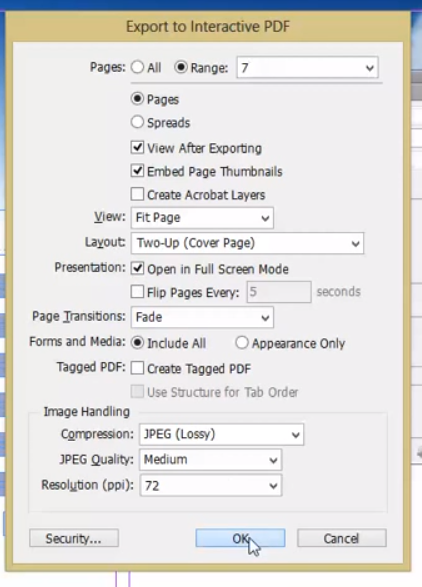
If you the go to File > Export and choose PDF (Interactive) there are a few settings on this window that essentially control how Adobe InDesign presents your PDF in Adobe Acrobat, the main one though is the tick box 'Open in full screen mode' this will make the PDF really presentable with no tool bars visible etc, you can also specify a page transition if you have multiple pages in your finished Adobe PDF file.

And here we have the finished form transitioning from Adobe InDesign to Adobe Acrobat!
<a href="https://creativestudios.thinkific.com/courses/indesign-essentials" target="_blank" rel="noopener">50% OFF WITH CODE 'CSBLOG'</a>
