How to Create Pattern Swatches in Adobe Illustrator
- Mark Williams

- Aug 31, 2016
- 4 min read
Updated: Dec 30, 2024
What is a Pattern Swatch in Adobe Illustrator?
In dictionaries, swatches are normally defined as being sample pieces of cloth, fabric and sometimes paints, designed to provide examples of a larger design – i.e. for use in the physical world.
In the realms of Adobe Illustrator, a swatch is basically the same thing, only applied to the digital space that you’re working with. Adobe Illustrator swatches are any named patterns, colours, tints or gradients that are created for use on a single document.
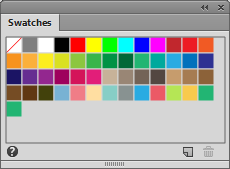
Creating swatches is extremely useful when working on an illustration. All swatches that you create and name will be displayed as tiles and stored in a Swatch Panel that will be saved into the document. This means that once you’ve found or created your perfect swatches, they can easily be retrieved for further use at a later date.

Pattern Swatches


The swatches in the above example are just single colours. However, they don’t have to be. A swatch can be any pattern and made up of as many colours as you like. Here are some examples of pattern swatches:
Such decorative patterns are extremely useful and indeed extremely powerful design visuals that can be utilised for creating pieces of art, decorating consumer products, for use in fashion design, creating backgrounds for websites, making cards, brochures, book covers – anything you like.
What is more, they are very simple to create for yourself using Adobe Illustrator – so let’s drill down into how you do just that.
How to Create Pattern Swatches in Adobe Illustrator
Illustrator comes with many existing patterns, which can be accessed via the Swatches Panel. Dig these out and have a browse – you may find exactly what you’re looking for! You can, of course, customise any of the existing patterns using all the usual Illustrator tools But, what you want to know is how to create a pattern swatch from scratch.
Here’s a step by step guide
1. Make a Vector Square
Ok, first you need to create your square, which will form the tile outline of the swatch. Create a new document, and navigate to View > Show Grid. This places a squared, plain grid pattern on your document (like you used to get in maths text books at school), making it much easier to create you square. With your square drawn out, go to View > Snap to Grid, and your square will be perfectly aligned with the grid. Now fill your square with the background colour of your choice.
2.Add Shapes to Create Your Pattern
Now it’s time to make your pattern. Use any vector images that you like or have previously created in Illustrator. You may want to make a flower pattern, for instance, made up of individual flowers that you have previously created. Arrange your flowers (or other shapes) over the tile. If all of the elements fit within the square and don’t overlap the edges, then great! You’re almost good to save your swatch and place it in the Swatches Panel, and can in fact skip to step 5 in this guide.
If, however, your shapes do overlap the edges, then follow the next steps first.
3.Positioning Overlapping Elements
If a few of your flowers petals overlap, say, the left-hand edge of your tile, then you will need to do the following. First, select your background square, plus the elements that overlap the edge. Now, holding down the Alt key (which copies your selection), drag the copy of the new square (plus selected elements) over to the right of the original square and line it up perfectly. You will see now how the elements that overlap the left side of the swatch fit onto the right side of it when you later expand the pattern. (You may need to do some readjusting of your elements at this stage, and then repeat the copying and dragging process again so the pattern looks just right when expanded. Keep experimenting and adjusting until you’ve nailed it).
You can now delete the background square (though keep the shapes where they are). Repeat the process if any other sides contain overlapping elements – if there are shapes that overlap the bottom edge, then, when you make your copy, you will need to drag it up to the top of the original square.
4.Trim up the Square
You will be left with a single square with a number of shapes sticking out of the edges. When you go to generate the swatch in a moment, you don’t want the sticky-outy bits, so trim the square around the edges and delete these.
5. Save Your Swatch
Congratulations – you’ve just created a pattern swatch! Select all, and drag it over to the Swatches Panel. Now, locate it in the Panel, click on it, and go to Swatches Library Menu > Save Swatches. Give it a name, and save it in the Swatches Folder in a .ai format.
Boom! You’re done. Wasn’t so difficult was it?


Comments