What are Adobe Photoshop Layer and Vector Masks?
- Mark Williams

- Oct 13, 2017
- 2 min read
Updated: Dec 30, 2024
Using Adobe Photoshop Layer and Vector Masks we are able to temporarily hide and show parts of a layer without permanently deleting any of the pixels, essentially an Adobe Photoshop layer mask is an attachment to a layer that defines the visible elements of the layer.
Each layer in a multi layered Adobe Photoshop document can have its own layer mask, the mask only influences the the image on the layer that it is attached too.
There are two types of Adobe Photoshop layer masks, layer and vector. A layer mask also known as a pixel mask is a resolution dependent image created with the painting and selection tools, whilst a vector mask is a resolution independent object created with the pen or a shape tool that contains anchor points.
To create masks we can use the add mask button at the bottom of the Adobe Photoshop layers panel, this button can create layer (pixel) and vector masks.
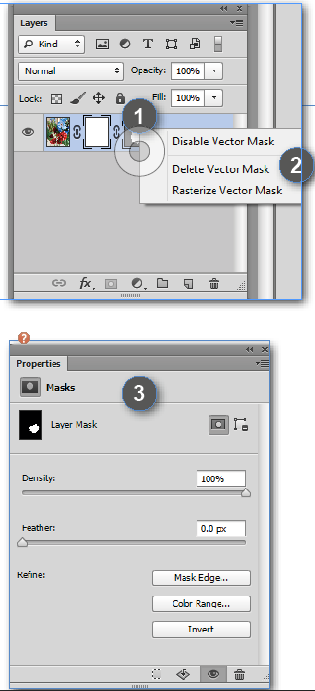
We can also use the Adobe Photoshop properties panel to edit the mask, we have options to change the opacity to let more or less of the masked content through, invert the mask or refine the mask edges by feathering etc.
Essentially a layer mask is a greyscale image where solid black represents complete transparency and white represents the visible elements, shades of grey represent levels of transparency.
A vector mask represents a path where the object clips out the contents of the layer. We can also use the Adobe Photoshop properties panel to refine the mask with the same options as the layer (pixel) mask.

Creating an Adobe Photoshop Layer Mask
1. Select the layer that will contain the mask
2. Click the ‘Add Layer Mask’ button on the layers panel
3. Click on the mask thumbnail to modify or paint on the mask
4. Use the properties panel to control Density, Feathering and Refine the Edge

Creating an Adobe Photoshop Layer Mask using selections
1. Select the layer that will contain the mask
2. Select the areas of image you want to preserve using any of the selection tools
3. Click the ‘Add Layer Mask’ button on the layers panel
4. Use the properties panel to control Density, Feathering and Refine the Edge

Creating a Vector Mask
1.Create a vector path (not a shape layer) with the pen or shape tools
2. Select the vector path with the direct selection tool
3. Select the layer that will contain the vector mask
4. Click the ‘Add mask’ button at the bottom of the layers panel twice.
5. Use the properties panel to control Density and Feathering.

Modifying Adobe Photoshop Layer and Vector Masks
1.To select the mask click on the mask thumbnail on the image layer, you can then modify the mask with the paint or vector path selection tools.
2. To disable, enable or delete the mask right click on the mask thumbnail
3. Use the properties panel to control Density, Feathering and refine the Mask.

Comments